JAVA集合学习之List篇
JAVA集合学习之List篇
1.集合的好处和理解
1.1数组
1.长度开始必须指定,而且一旦修改,不能更改
2.保存的必须是同一个类型的元素
3.使用数组进行增加、删除元素比较,麻烦
1.2集合
1.可以动态保存任意多个对象,使用比较方便
2.提供一系列方便的操作对象的方法:add、remove、set、get等等
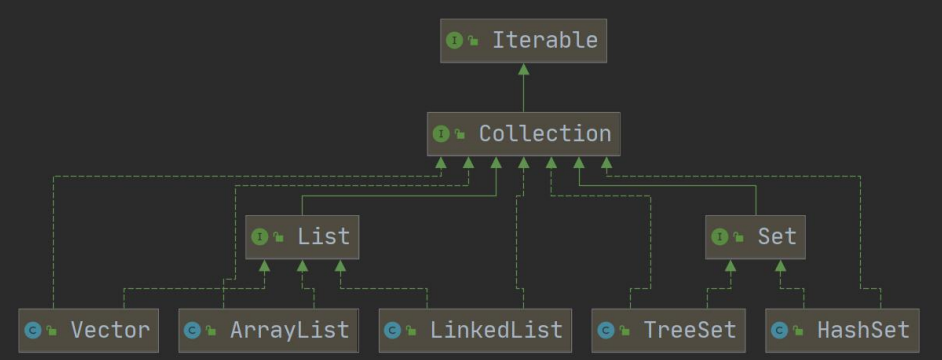
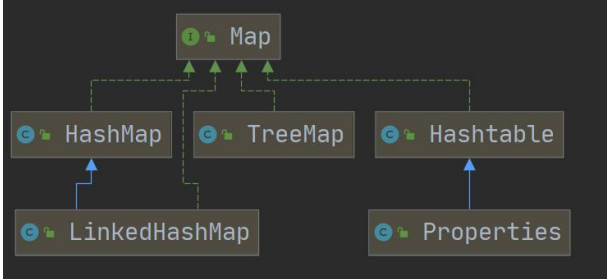
2.集合的框架体系(背)
3.Collection接口和常用方法
3.1Collection接口实现类的特点
1.实现这个接口的子类,可以存放多个元素,每个元素可以是Object
2.有些实现这个接口的子类,有些是有序(List),有些是无序(Set)
3.有些实现这个接口的子类,有些可以存放重复元素,有些不行
4.Collection接口没有直接的实现子类,通过子接口List和Set来实现
3.2Collection接口的常用方法
add()、remove()、contains()、isEmpty()、clear()、addAll()、removeAll()
1 | |
3.3Collection接口遍历元素方式
方式1 (使用Iterator迭代器)
1.Iterator称为迭代器,主要用于遍历Collection集合的元素
2.所有实现Collection接口的子类都有一个Iterator()方法,该方法返回一个实现Iterator接口的对象,即可以返回一个迭代器
3.执行原理
1 | |
方式2(增强for循环)
就是简化版的迭代器,底层和迭代器一样
1 | |
4.List 接口和常用方法
4.1 List 接口基本介绍
List接口是Collection接口的子接口
1.List集合中元素有序,(添加和取出的顺序一致)、且元素可重复
2.List集合中每个元素都支持索引,可以通过下标取得元素,例如list.get(1)
1 | |
4.2 List接口的常用方法
| 方法 | 描述 |
|---|---|
| void add ( int index , Object ele) | 在index位置插入ele元素 |
| boolean addAll ( int index , Collection eles) | 从index位置开始将eles中的所有元素添加进来 |
| Object get ( int index ) | 获取指定index位置的元素 |
| int indexOf ( Object obj) | 返回obj在集合中首次出现的位置 |
| int lastIndexOf ( Object obj) | 返回obj在当前集合中末次出现的位置 |
| Object remove ( int index) | 移除指定index位置的元素,并返回此元素 |
| Object set ( int index , Object ele) | 设置指定index位置的元素为ele,相当于是替换 |
| List subList ( int fromeIndex , int toIndex) | 返回从fromIndex 到 toIndex 位置的子集合(左闭右开) |
1 | |
4.3List的三种遍历方式
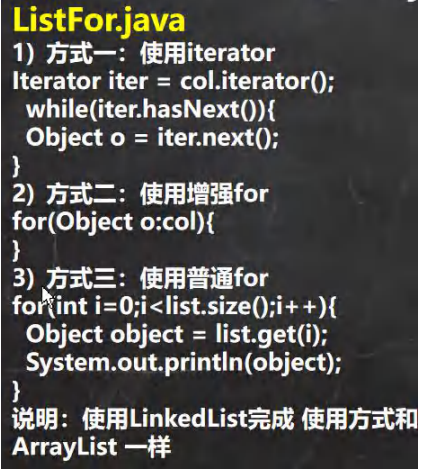
1 | |
4.4 ArrayList 底层结构和源码分析
1.ArrayList 注意事项
- ArrayList 可以加入null,并且多个
- ArrayList是由数组来实现的
- ArrayList基本等同于Vector,除了 ArrayList是线程不安全(执行效率高),在多线程情况下,不建议使用ArrrayList。
1 | |
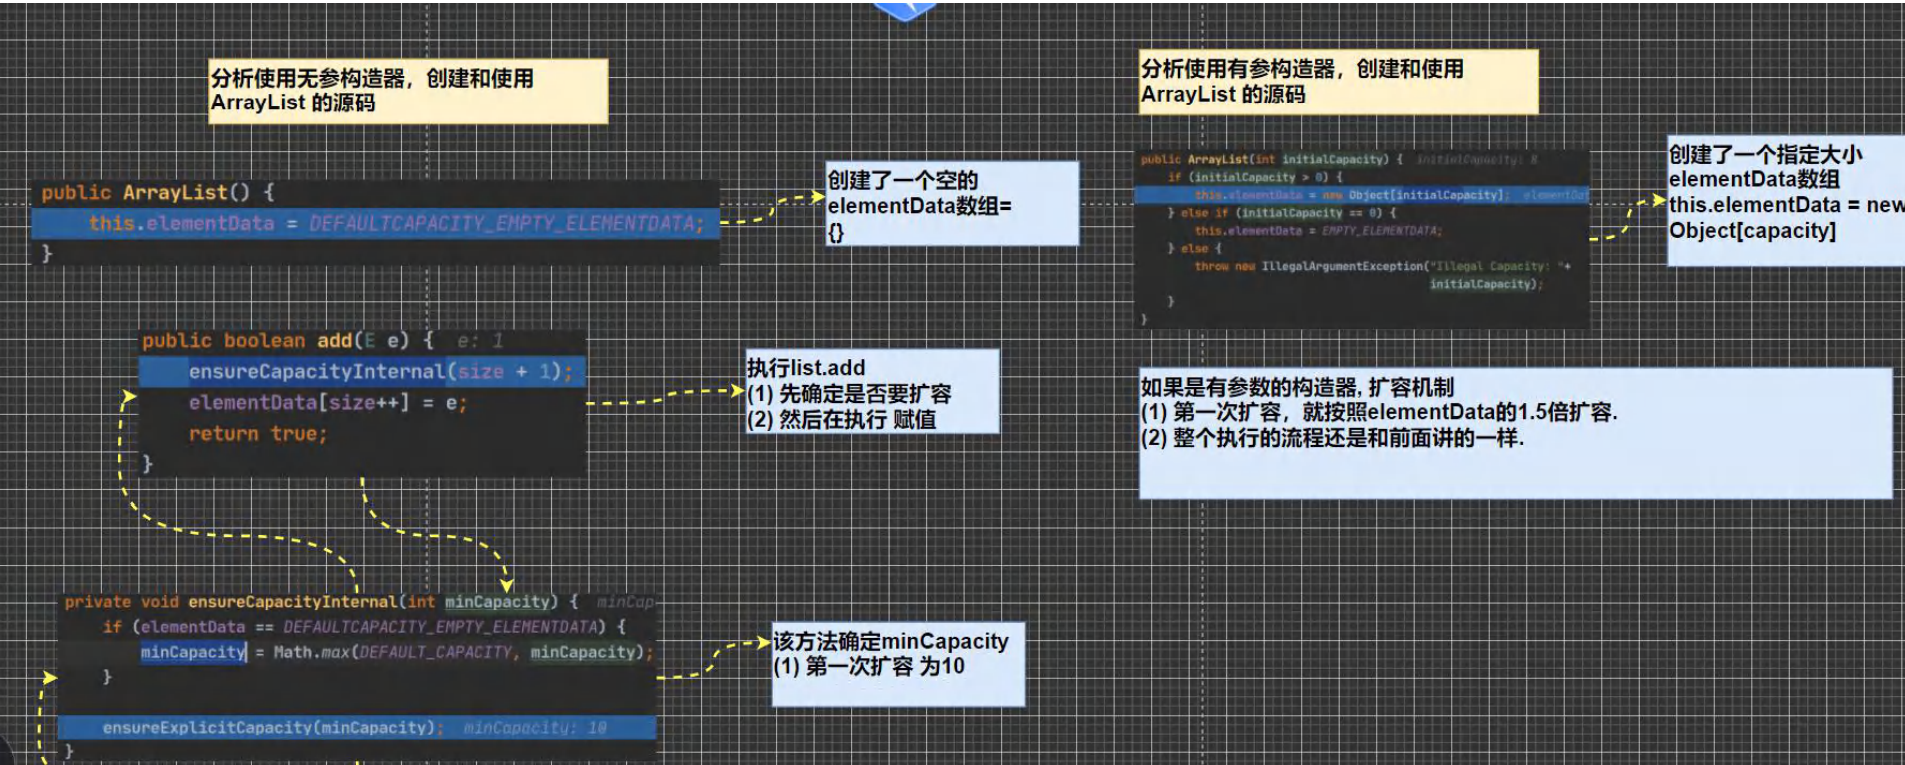
2.ArrayList 的底层操作机制源码分析(重点,难点)
- ArrayList 中维护了一个 Object类型的数组 elementData。
transient Object[] elementData; // transient 标识瞬间,短暂的,表示该属性不会被序列化 - 当创建ArrayList对象时,如果使用的是无参构造器,则初始elementData 容量为0,第一次添加,则扩容elementData为10,如需再次扩容,则扩容elementData为1.5倍。
- 如果使用的是指定大小的构造器,则初始elementData容量为指定大小,如果需要扩容,则直接扩容elementData为1.5倍
源程序
1 | |
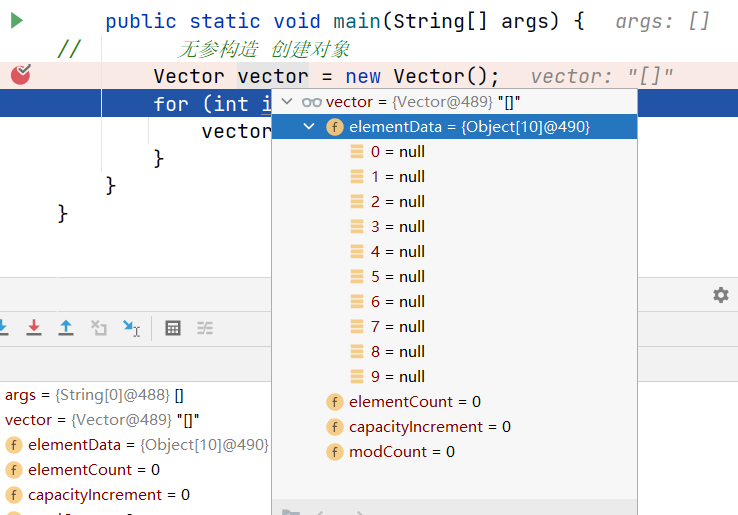
在
ArrayList list = new ArrayList();处添加断点debug – step Into 到 ArrayList.java的ArrarList()构造方法
1 | |
查询DEFAULTCAPACITY_EMPTY_ELEMENTDATA可发现 默认为空数组
1 | |
- 第一次for循环,程序先进入
Integer valueOf()方法对数据进行装箱
1 | |
然后执行 list 的boolean add(E e)方法
1 | |
在boolean add(E e)方法中,先执行ensureCapacityInternal(size + 1)方法确定是否要扩容,然后再执行赋值。
1 | |
在calculateCapacity()方法中 先确定elementData是否为空数组,如果为空数组,返回DEFAULT_CAPACITY(默认为10) 和 minCapacity(第一次为1) 中的最大值,
1 | |
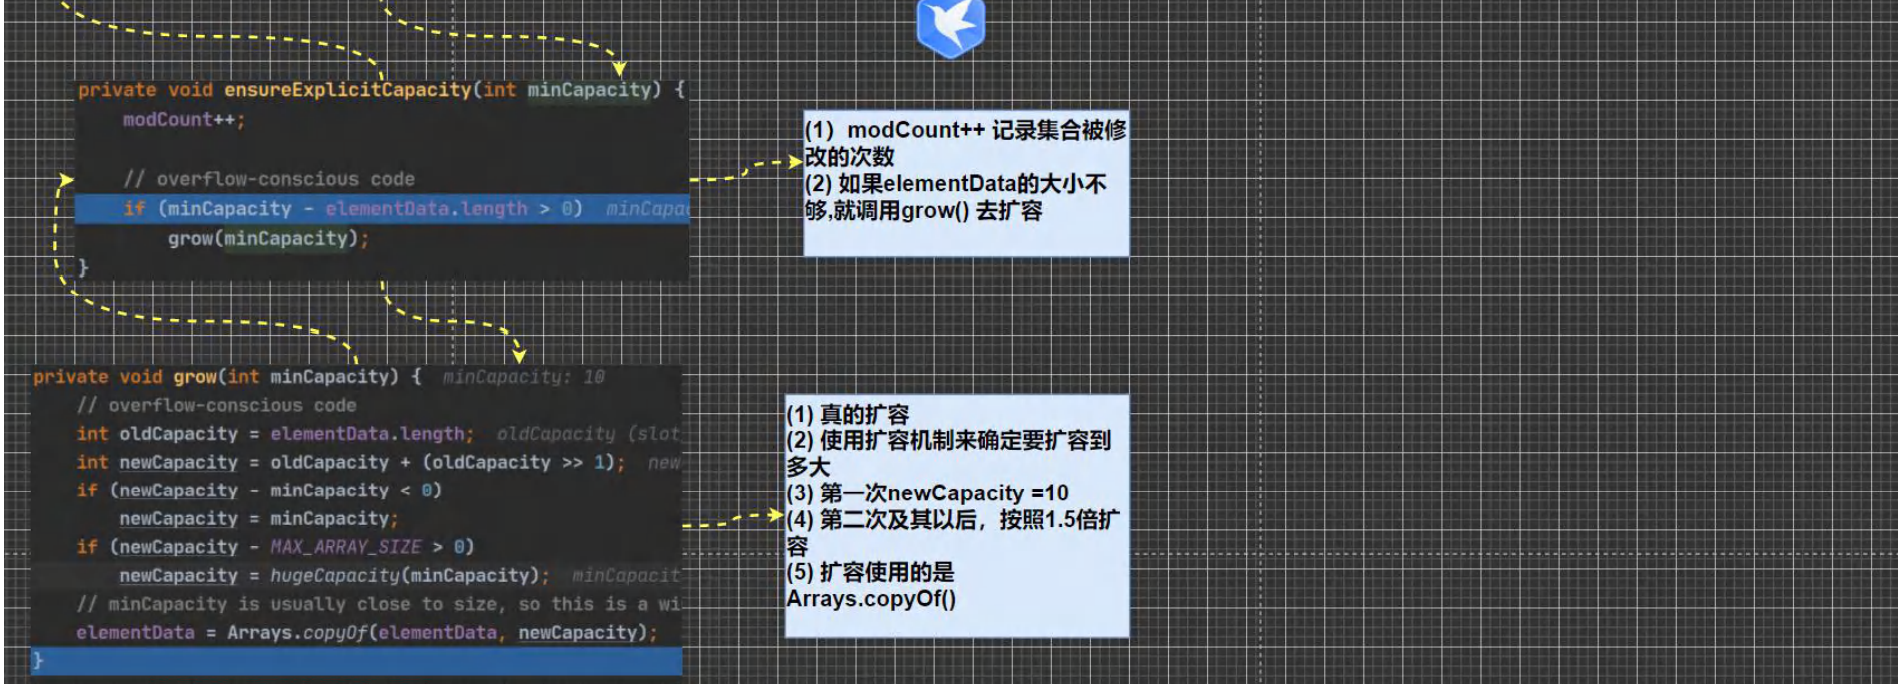
在ensureExplicitCapacity(int minCapacity)方法中确定是否真的扩容
modCount++ :记录集合修改次数
minCapacity - elementData.length > 0 :如果数组所需最小容量 - 数组当前实际大小 大于 0 则执行扩容
1 | |
grow()方法执行扩容
- 将elementData.length 记录到 oldCapacity中,第一次值为0
- newCapacity = oldCapacity + (oldCapacity >> 1); 执行扩容,扩容大小为 数组当前容量+数组当前大小右移1位(除以2),即扩容1.5倍
- 因为第一次扩容oldCapacity 为0 所有newCapacity 也为0,执行
if (newCapacity - minCapacity < 0) newCapacity = minCapacity;
此时newCapacity 为 10,所以第一次扩容大小为 10 elementData = Arrays.copyOf(elementData, newCapacity);
Arrays.copyOf()方法可保留原先数据扩容
执行Arrays.copyOf()方法进行扩容,第一次执行完elementData 中有10个空数据
1 | |
扩容完成后,继续执行add()方法,将数据添加到elementData数组中
流程图如下:
4.5Vector的基本介绍和源码分析
4.5.1基本介绍
1.Vector的定义

2.Vector 底层也是一个对象数组,protected Object[] elementData;
3.Vector 是线程同步的,即线程安全,Vector 类的操作方法带有 ==synchronized==
1 | |
4.在开发中,需要线程同步安全时,考虑使用Vector.
5.Vector和ArrayList的比较
| 底层结构 | 版本 | 线程安全(同步)效率 | 扩容倍数 | |
|---|---|---|---|---|
| ArrayList | 可变数组 | jdk1.2 | 不安全,效率高 | 如果有参构造1.5倍,如果是无参 ,默认初始化容量是0,第一次扩容为10,然后以后扩容按1.5倍扩 |
| Vector | 可变数组 | jdk1.0 | 安全,效率不高 | 如果是无参,默认初始化容量10,满后,就按2倍扩容。如果指定大小,则每次直接按2倍扩容 |
4.5.2 Vector源码分析
创建Vector对象,并循环添加
1 | |
创建Vector 对象,首先执行无参构造器
1
2
3public Vector() {
this(10);
}1
2
3public Vector(int initialCapacity) {
this(initialCapacity, 0);
}所以 new Vector() 会默认创建 容量为10的 对象
 ](
](add 方法添加
1
2
3
4
5
6public synchronized boolean add(E e) {
modCount++;
ensureCapacityHelper(elementCount + 1);
elementData[elementCount++] = e;
return true;
}首先执行ensureCapacityHelper() 方法判断是否要扩容。
如果数组所需最小容量大于当前数组容量,执行grow()方法扩容。
1
2
3
4
5private void ensureCapacityHelper(int minCapacity) {
// overflow-conscious code
if (minCapacity - elementData.length > 0)
grow(minCapacity);
}grow()方法源码:
默认扩容两倍大小。
1
2
3
4
5
6
7
8
9
10
11private void grow(int minCapacity) {
// overflow-conscious code
int oldCapacity = elementData.length;
int newCapacity = oldCapacity + ((capacityIncrement > 0) ?
capacityIncrement : oldCapacity);
if (newCapacity - minCapacity < 0)
newCapacity = minCapacity;
if (newCapacity - MAX_ARRAY_SIZE > 0)
newCapacity = hugeCapacity(minCapacity);
elementData = Arrays.copyOf(elementData, newCapacity);
}也可指定扩容大小。在vector带参构造器中指定扩容大小
1
2
3
4
5
6
7
8public Vector(int initialCapacity, int capacityIncrement) {
super();
if (initialCapacity < 0)
throw new IllegalArgumentException("Illegal Capacity: "+
initialCapacity);
this.elementData = new Object[initialCapacity];
this.capacityIncrement = capacityIncrement;
}
4.6LinkedList底层结构
4.6.1 LinkedList 基本介绍
- LinkedList底层实现了双向链表和双端队列特点
- 可以添加任意元素(元素可以重复),包括null
- 线程不安全,没有实现同步
4.6.2 LinkedList 的底层操作机制
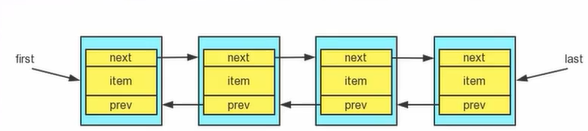
LinkedList 底层维护了一个双向链表
LinkedList中维护了两个属性 first 和 last 分别指向 首节点和尾节点
每个节点(Node对象),里面又维护了prev、next、item、三个属性,其中通过prev指向前一个,通过next指向后一个节点。最终实现双向链表。
LinkedList的元素的添加和删除,不是通过数组完成的,相对来说效率较高。
4.6.3 LinkedList 源码分析
LinkedList的增删改查案例
1
2
3
4
5
6
7
8
9
10
11
12
13
14
15
16
17
18
19
20
21
22
23
24
25
26
27
28
29
30
31
32
33
34
35
36
37
38
39
40
41
42
43
44
45@SuppressWarnings({"all"})
public class LinkedListCRUD {
public static void main(String[] args) {
LinkedList linkedList = new LinkedList();
linkedList.add(1);
linkedList.add(2);
linkedList.add(3);
System.out.println("linkedList="+linkedList);
// 删除节点,默认删除首节点
linkedList.remove();
System.out.println("linkedList="+linkedList);
// 修改某个节点对象
linkedList.set(0,666);
System.out.println("linklist="+linkedList);
// 得到某个节点对象
// get(1)为第二个对象
Object o = linkedList.get(1);
System.out.println(o);
// LinkedList 实现 List 接口 遍历可是迭代器
System.out.println("====linkedList迭代器遍历");
Iterator iterator = linkedList.iterator();
while (iterator.hasNext()) {
Object next = iterator.next();
System.out.println(next);
}
System.out.println("====增强for循环遍历");
for (Object o1 : linkedList) {
System.out.println(o1);
}
System.out.println("====传统for循环");
for (int i = 0; i < linkedList.size(); i++) {
System.out.println(linkedList.get(i));
}
}
}
4.6.4 LinkedList 添加元素
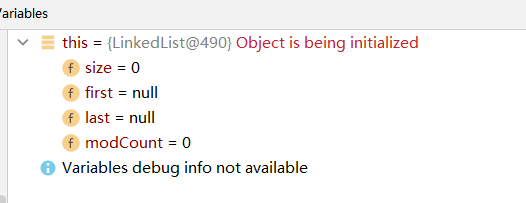
创建集合对象
LinkedList linkedList = new LinkedList();1
2
3
4
5/**
* Constructs an empty list.
*/
public LinkedList() {
}初始化双向链表
执行add()方法
1
2
3
4public boolean add(E e) {
linkLast(e);
return true;
}将新的节点,加入到双向链表的最后
1
2
3
4
5
6
7
8
9
10
11void linkLast(E e) {
final Node<E> l = last;
final Node<E> newNode = new Node<>(l, e, null);
last = newNode;
if (l == null)
first = newNode;
else
l.next = newNode;
size++;
modCount++;
}
4.6.5 LinkedList 删除元素
1 | |
首先让 f 指向 首节点,判断首节点是否为空;
如果为空,抛出异常;
如果不为空,执行删除操作;
1
2
3
4
5
6public E removeFirst() {
final Node<E> f = first;
if (f == null)
throw new NoSuchElementException();
return unlinkFirst(f);
}执行删除操作
将 首节点置空,first指向下一个节点,下一个节点的prev指向空,即将下一个节点调整为首节点,原首节点有GC算法回收。
1
2
3
4
5
6
7
8
9
10
11
12
13
14
15private E unlinkFirst(Node<E> f) {
// assert f == first && f != null;
final E element = f.item;
final Node<E> next = f.next;
f.item = null;
f.next = null; // help GC
first = next;
if (next == null)
last = null;
else
next.prev = null;
size--;
modCount++;
return element;
}
4.6.6 ArrayList 和 LinkedList 比较
| 底层结构 | 增删效率 | 改查效率 | |
|---|---|---|---|
| ArrayList | 可变数组 | 较低,数组扩容 | 较高 |
| LinkedList | 双向链表 | 较高,通过链表追加 | 较低 |
如何选择ArrayList和LinkedList:
- 如果改查的操作较多,选择ArrayList
- 如果增删的操作较多,选择LinkedList
- 一般来说,程序中,80%-90%都是查询,因此大部分情况下选择ArrayList
- 在一个项目中,根据业务灵活选择,也可能这样,一个模块使用的是ArrayList,另外一个模块是LinkedList。根据业务合理选择。
本博客所有文章除特别声明外,均采用 CC BY-SA 4.0 协议 ,转载请注明出处!